

Buying or inheriting a second-hand iPhone is common, but it is frustrating when the owner forgets to sign out their Apple ID. In that situation, you cannot utilize all the functionality of the iPhone, such as installing an app from the App Store. Therefore, you need to remove the previous Apple account from the device so you can add your Apple ID on the iPhone.
For this purpose, you can get assistance from this guide, which shows all the real-time approaches to erasing Apple accounts from second-hand iPhones. Thus, head down to learn about a powerful iPhone unlocker and how iPhone owners can remove the Apple ID from their old devices so others can use it fully.
Part 1. Request the Owner to Erase Your iPhone from Their iCloud
The first approach is more reliable and authentic, in which you have to request the iPhone’s owner to remove the device from their iCloud. For this purpose, they don’t need to relocate, install additional setups, or delve into any complexities. Simply put, they are only required to access the iCloud Web on their web browser, and the rest of the process is explained in the steps below:
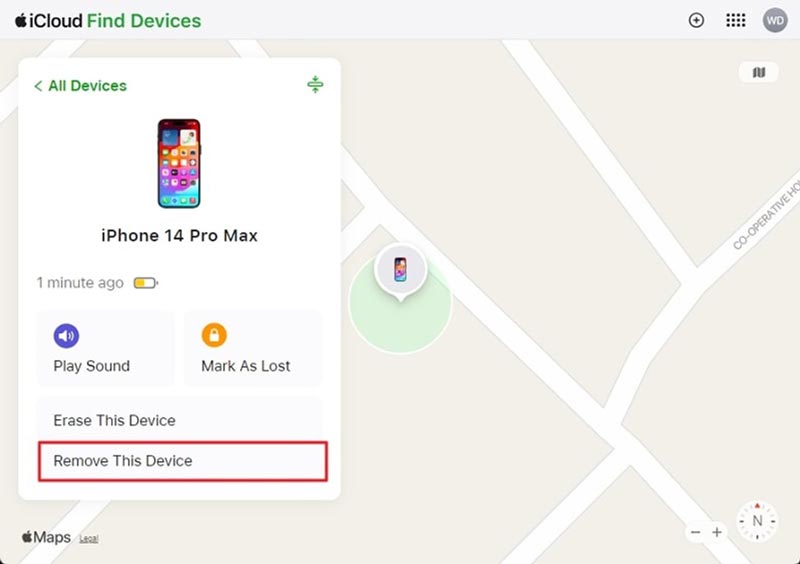
Step 1. Ask the previous iPhone owner to input the Apple ID credentials on iCloud Web and sign in. Then, access the “Find My” app from the Apps widget present on the home screen to access all the devices linked with that Apple ID.

Step 2. They will have to choose your iPhone from there and click the “Remove This Device” option. Proceed with the “Remove” button in the next pop-up and follow the on-screen instructions. It will lead to removing iCloud from your iDevice to set up your Apple account.
Part 2. Remove the iPhone Screen Lock with the Most Powerful iPhone Unlocker
Some owners might have forgotten the Apple ID credentials, which will cause difficulty in using all the premium features provided by Apple. For this, you can seek a reliable solution that does not require Apple ID credentials to unlock your iPhone device. Thus, only one powerful iPhone unlocker, Wondershare Dr.Fone, can unlock the iPhone without entering the Apple ID credentials.
Moreover, this iPhone unlocker offers versatile features to fix your iOS-related concerns. You can even remove the iTunes backup encryption with this amazing tool. For your help, we will also provide its guide in this part so you can learn how to use this tool to unlock your iPhone without the owner’s permission.
1. With this tool, you can effortlessly bypass the iCloud activation lock of iOS devices without an Apple ID.
2. Users can even remove the SIM Lock to use any carrier from all over the world via Wondershare Dr.Fone without losing personal data.
3. Its intuitive interface allows every beginner to operate this unlock iOS screen tool without requiring technical skill.
A Comprehensive Step-By-Step Guide to Remove the Apple ID with Dr.Fone
For security reasons, every Apple user understands how to keep an Apple ID secure. For this reason, most iPhone users decide to create strong passwords while making Apple IDs and end up forgetting credentials after a while. Or, you have purchased the iPhone from an online market without recognizing the owner of the iPhone; in this situation, the following guide will help you.
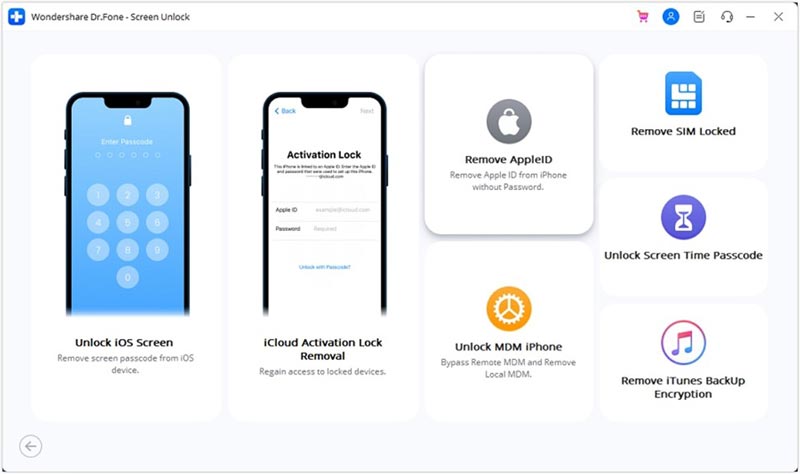
Step 1. Reach into Screen Unlock Tool
To start the process, you need to install and launch Wondershare Dr.Fone on your computer and proceed by accessing the “Toolbox” tab. Here, choose the “Screen Unlock” tool and confirm your device as iOS to activate specific features. Afterward, select “Remove Apple ID” from the next window, which shows the functions of removing Apple ID. Then, attach your iOS device to the computer and click “Unlock Now.”
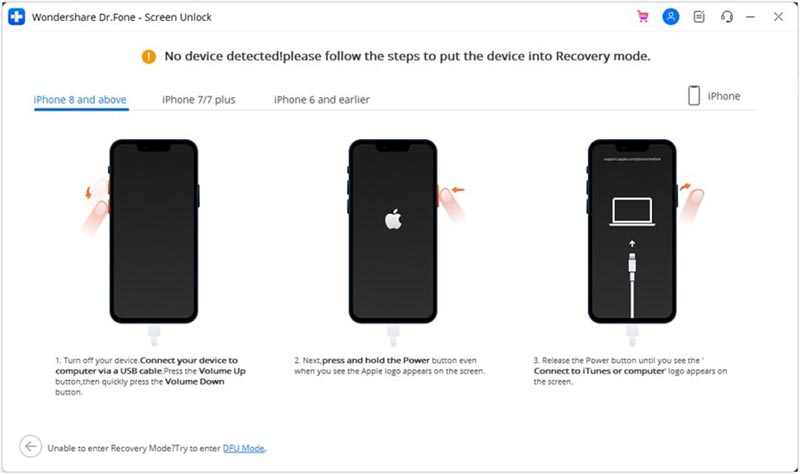
Step 2. Confirm the Lock Details and Activate Recovery Mode
Proceed with the confirmation of the screen lock by pressing the “Yes” option. Then, you will be asked for two-factor authentication on the next screen. Simply click on “Yes” if it is turned on. Once done, a prompted screen will appear to put you in “Recovery Mode” through the steps provided on the screen. Afterward, select the “System version” for your Device Model and continue the process by clicking “Start.”
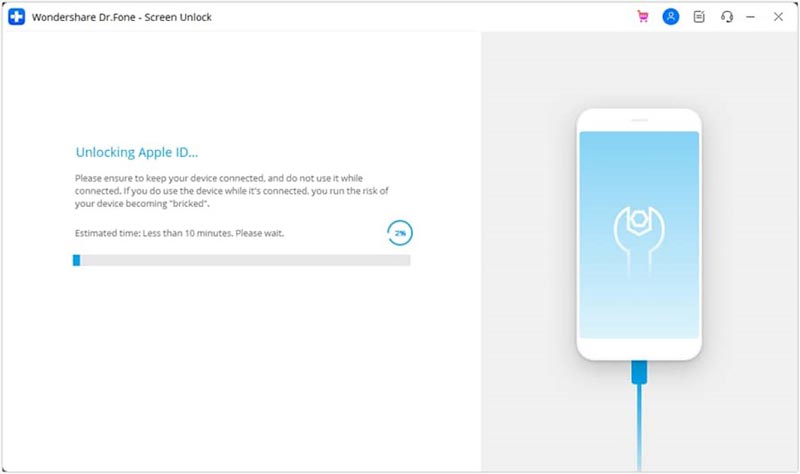
Step 3. Downloading iOS Firmware and Unlock Apple ID
After putting your iOS device into Recovery Mode, the progress bar will display, showing you the downloading progress of iOS Firmware. Once the firmware is downloaded and verified, press “Unlock Now” to unlock the Apple ID and hit the “Unlock” button on the confirmation pop-up. Then, it will display the Apple ID removal progress on the screen, and once it is completed, click “Done” to unlock the Apple ID successfully.
Last Words
In essence, iPhone users can unlock the iCloud with and without permission from their previous owner. For this purpose, this guide highlights precise steps that anyone can utilize and conveniently guides the owners for unlocking iCloud. If you cannot unlock it through the Find My app, you should try Wondershare Dr.Fone, the ultimate iPhone unlocker to unlock Apple ID, regardless of the reasons.
0 Comments