

Cloning a Mac hard drive is helpful in multiple ways, especially when you need to upgrade to a larger storage capacity, want to transfer data to a new Mac, etc. It is a crucial and quite complicated process to clone a Mac hard drive to another Mac. To help you out, in this article, we will discuss step-by-step instructions on how to clone a Mac hard drive to another Mac and to restore data, if deleted during cloning.
When You Should Clone a Mac Hard Drive?
As mentioned above, cloning a Mac hard drive is helpful in multiple cases. It is important to ensure data preservation, system stability, and seamless transitions. Here are some more instances when you should consider cloning a Mac hard drive:
- Upgrading Storage Capacity: If you are planning to replace your existing hard drive with a larger one, then you can clone it to increase its capacity.
- Transferring to a New Mac: When you purchase a new Mac and want to transfer all your data, apps, and settings from the old Mac to the new one, then cloning your Mac will be helpful.
- Preserving System State: You can clone your Mac hard drive to create a snapshot of your current system configuration, including preferences and settings.
- Avoiding Downtime: Before you perform critical maintenance or repair work on your Mac, cloning the hard drive can help to minimize downtime.
- Creating Bootable Backups: Cloning a Mac hard drive can create a bootable backup which you can use to start up and run your Mac in case of emergencies.
Tips to Consider Before You Clone Mac Hard Drive
Before you start the process of cloning your Mac hard drive, it’s important to consider several factors to ensure a smooth and successful operation. Here are some important things to keep in mind:
- Backup Your Data: It is good practice to create backups of your important data either on an external storage drive or a cloud location. You can even use the built-in Time Machine utility to create a backup and restore data if data loss arises after the cloning process.
- Check Your Device Storage: Make sure that your target drive (the drive that you need to clone) has enough free space to accommodate all the data from the source drive. If you lose data from your hard drive while managing the storage, you need to apply adequate steps for data recovery for Mac to restore deleted data.
- Select the Right Cloning Method: It is important to choose the appropriate cloning method, whether using built-in tools like Disk Utility or third-party software. Consider factors like user interface, features, etc. before you proceed with any cloning method.
- Check Source Drive Health: Before cloning, check the health of your source drive using Disk Utility or professional disk health tools. If any issue, such as bad sectors or imminent drive failure, is found before proceeding, apply the relevant methods to fix them.
- Disconnect Unnecessary Devices: Disconnect all the unnecessary external devices or peripherals from your Mac before you clone its hard drive. This minimizes the risk of interference and potential errors.
Step-by-Step Instruction to Clone a Mac Hard Drive Using Disk Utility
Go through the below-given steps to learn how to clone a Mac hard drive to another Mac using the built-in Disk Utility tool:
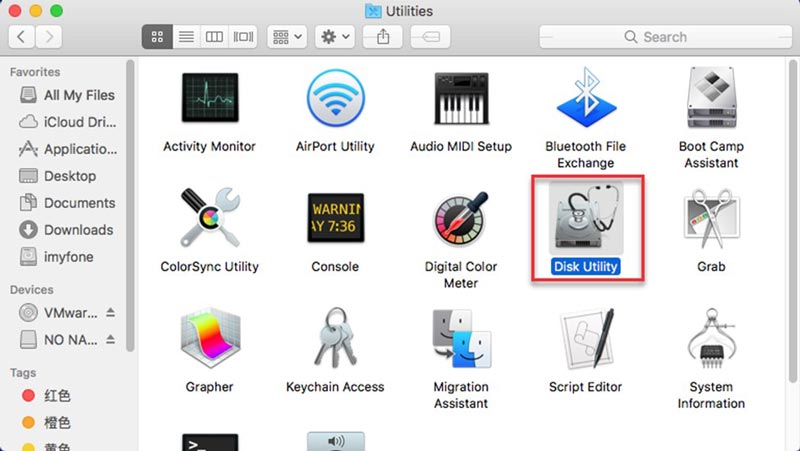
- Firstly, launch Disk Utility on your Mac from Utilities or Applications.
- From the left navigation pane, select the storage location that you need to make your backup drive.
- Tap the “Restore” button from the top menu bar of the Mac Disk Utility interface.
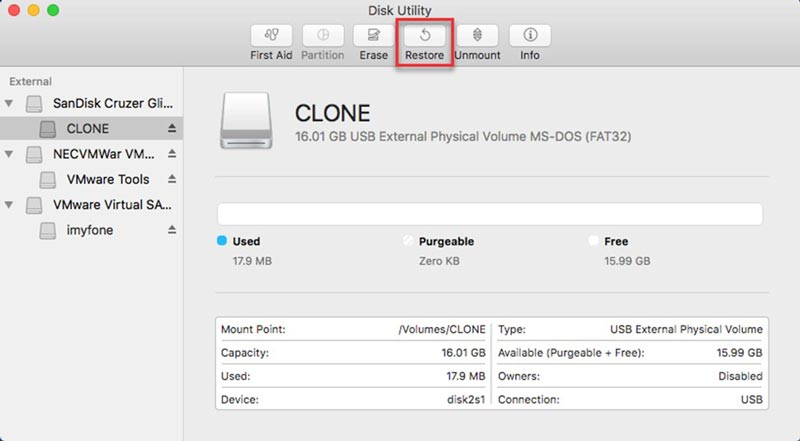
- Now, choose the source drive that you need to clone and drop it in the “Source” field.
- Also, drag and drop the destination disk at the “Destination” field.
- Lastly, click “Restore” and wait till all the content is copied and saved on the destination drive.

What if Data Loss Occurs While Cloning Mac Hard Drive?
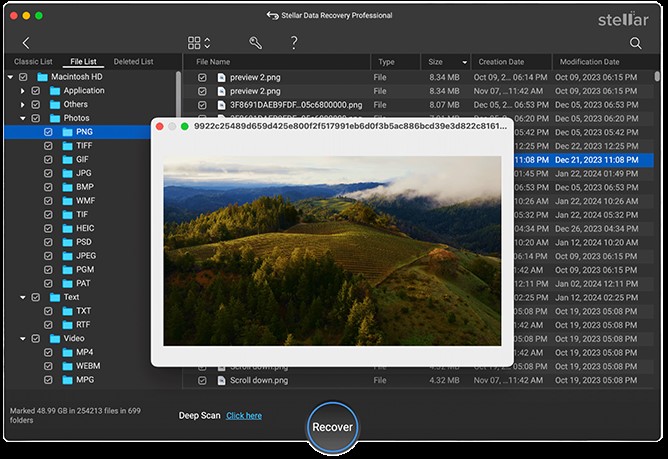
Instances may occur when you experience data loss on your Mac while cloning its hard drive to another Mac. In such cases, you can use a Mac data recovery software. Stellar Data Recovery Professional for Mac is an all-in-one Mac data recovery software which allows you to restore lost files in three simple clicks, i.e., Select, Scan, and Save.
- The Stellar Data Recovery Professional for Mac tool supports the recovery of deleted files of multiple formats, including photos, videos, documents, and many more.
- It supports recovery of files deleted from any internal or external storage drive, including SD cards, HDDs, USB drives, etc.
- The software is compatible with the latest macOS Sonoma 14 and Lower versions.
- It allows you to preview the recoverable files, so you can select and save only the required files back to your device.
Let’s check how to recover deleted data on Mac using this professional Mac data recovery software:
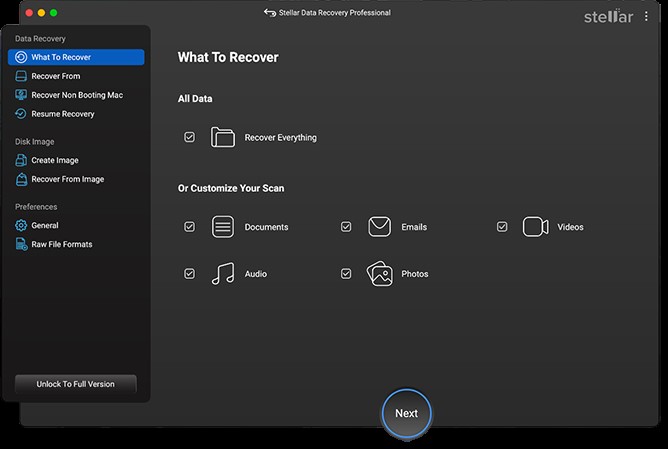
Step 1: Download and install the Stellar Data Recovery Professional for Mac tool on your device. Launch the software and from the homepage, select the type of file you need to restore and click Next.
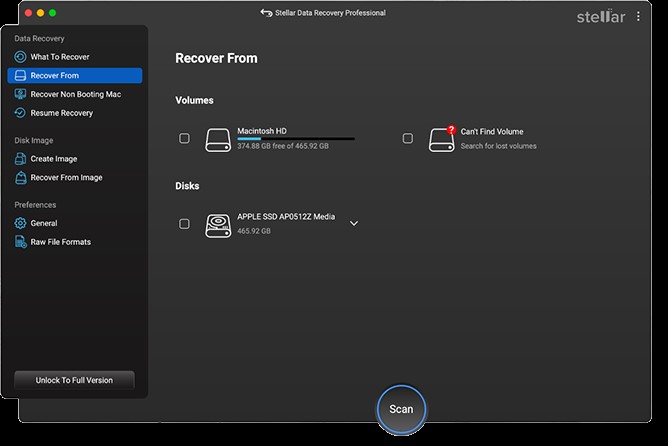
Step 2: Now, select the storage location from where you need to restore the deleted file and tap the Scan button.
Step 3: Once the scanning process is completed, preview the recoverable files and select the files you need to restore. Click the Recover button to save selected files back to the destination folder.
That’s it! After successful completion of the above steps, check if you can access the recovered data on your Mac.
Conclusion
Cloning a Mac hard drive is a crucial task for Mac users, but with the above steps, you can clone your Mac hard drive using Disk Utility. Make sure you have a proper backup of the hard drive that you need to clone to prevent data loss issues. However, if data loss occurs on your Mac while applying the above steps, you can try using a professional Mac data recovery tool to restore the lost data.
0 Comments