

Why iTop screen recorder
Recording your computer screen and audio at the same time can be extremely helpful in various situations. You may need to create a video tutorial or record a presentation, or you may want to capture gameplay footage. Whatever your reason, using the right tool can make the task much easier. And by now, you can guess the right tool. You guessed right iTop is the right tool because it is a user-friendly, powerful, and intuitive recorder that Enables you to record your screen activity and save it as a video. The free PC screen recorder has four different recording modes, allowing you to quickly and easily capture screen, camera, audio, and gaming videos. That not being enough, iTop Screen Recorder will help you:
Record and save in high-quality anything that is displayed on your computer screen.
Recording of high-performance games and 4K UHD video with no noticeable lag;
With one-click, record online meetings, classes, or any video material.
Make changes and edits to your recorded videos using the editor that is integrated right in.
The five simple steps
If navigating through and using this most economical screen recorder has always been your worry, then worry no more! Do you know why? Cause I got you! I will effectively describe how to use iTop Screen Recorder to record your computer screen and audio simultaneously, so sit back, relax, and learn with me.
To get started, please download and install iTop Screen Recorder. Once you have installed the software, launch it from your desktop, create the menu, and return it to my class.
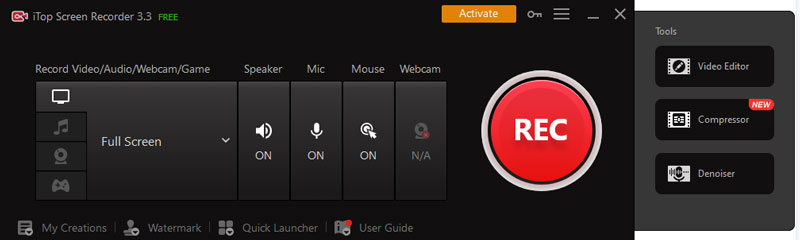
Step 1: Choose the Recording Mode
iTop Screen Recorder offers several recording modes, including full screen, custom area, webcam, and audio-only. To record your screen and audio simultaneously, select the Full-Screen mode.
To select the recording mode, click the “Recording Mode” button at the bottom of the iTop Screen Recorder window. This will bring up a dropdown menu where you can choose the Full-Screen mode.
Step 2: Customize the Recording Settings
Before you start recording, you can customize the recording settings. You can choose the video format, frame rate, and quality. You can also select the audio source, microphone, and speaker volume.
To customize the recording settings, click the “Settings” button at the bottom of the iTop Screen Recorder window. This will bring up a window where you can change the recording settings.
To choose the video format, click on the “Video” tab. You can choose from several video formats, including MP4, AVI, WMV, and more. You can also select the video quality and frame rate.
To choose the audio source, click on the “Audio” tab. Here you can select the audio source, microphone, and speaker volume. Select the microphone as the audio source if you want to record your voice. If you record system audio, select the speaker as the audio source.

Step 3: Start Recording
Once you have customized the recording settings, click the “Record” button to start recording. iTop Screen Recorder will count down from three before starting the recording.
While recording, you can use the “Pause” button to pause the recording if needed. You can also use the “Stop” button to stop the recording when finished.
Step 4: Watch and edit your video.
After you stop the recording, iTop Screen Recorder will automatically open the recorded video in its built-in player. You can preview the video and edit it if needed. You can trim the video, add text and image annotations, and adjust the video and audio settings.
Tap the “Preview” shortcut in the iTop Screen Recorder window to preview the recorded video. This will open the recorded video in the built-in video player.
Tap the “Edit” shortcut in the iTop Screen Recorder window to edit the recorded video. This helps you open the video editing window, where you can change the video.
Once you have finished editing the recorded video, you can save it to your computer in various formats. You can also share the video directly on YouTube, Vimeo, Facebook, and other social media platforms.
Tap the “Save” shortcut in the iTop Screen Recorder window to save the recorded video. This will give you a window to choose the video format and quality. Once you have selected it, click “Save” to save the video to your computer.
Tap the “Share” shortcut in the iTop Screen Recorder window to share the recorded video. This will allow you to choose the social media platform you want to share the video.
Now that you know, never let this be a worry to you. Never be charged, or even your friends, for screen recording. You can invite them for free quality services.
0 Comments