

This article will provide you with the 3 best solutions to remove write protection from hard drive. So, if you want to remove the write protection from your HDD then read this post till the end.
A write-protected hard drive is a storage device that has been configured to prevent users from making any changes to its contents. This means that you cannot write new data, or delete or modify existing files on the drive.
The write protection feature is useful for safeguarding important data from accidental or malicious changes or deletions. It can also be used to prevent viruses and malware from infecting the drive.
Despite of having such features, sometimes it creates problems for the users as the write-protected hard drive restricts them from accessing their hard disk.
If you are dealing with a write-protected hard drive and looking for ways to remove write protection from an external hard drive continue reading this post.
How to Remove/Disable Write Protection from External Hard Drive?
Solution 1: Use a Physical Switch to Remove Write Protection from Hard Drive
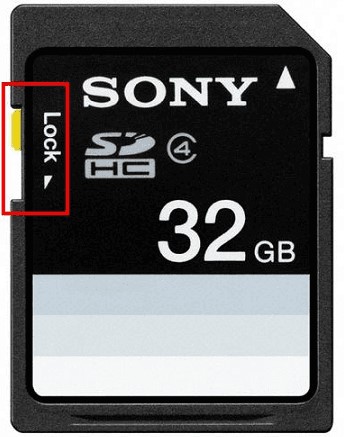
Some external hard drives are coming with a physical switch or button on their side that is used to lock or unlock the drive. If the switch is turned on, the drive will be locked or write-protected, which means no one will be able to write on it.
Therefore, to remove write protection from external hard drives you need to make sure that the switch is in the correct position.
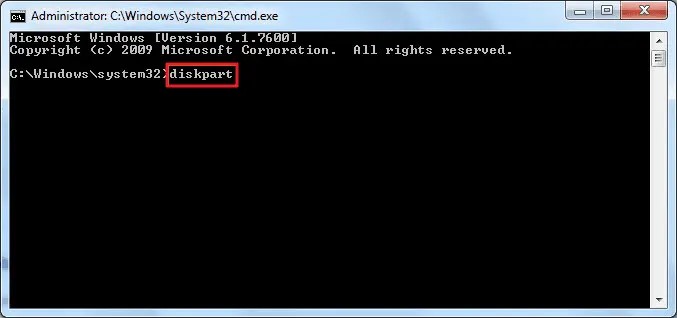
Solution 2: Remove Write Protection from External Hard Drive Using Diskpart
You can also remove write protection from your external hard drive using the Diskpart command in Windows.
Here are the steps you need to follow:
- Insert the hard drive into your computer’s using port.
- Open the Command Prompt as an administrator. To do this, click on the Start menu, type “cmd“, right-click on “Command Prompt“, and select “Run as administrator“.
- Type “diskpart” and press Enter. This will open the Diskpart command prompt.
- Type “list disk” and press Enter. This will display a list of all the disks on your computer.
- Find the disk number of your hard drive in the list and type “select disk X“, where “X” is the disk number of your hard drive. Press Enter.
- Type “attributes disk clear readonly” and press Enter. This command will remove the write protection from your external device.
- Type “exit” and press Enter to exit Diskpart.
- Close the Command Prompt and try to write on your hard drive again.
Note: Be careful when using the Diskpart command, as it can potentially damage or erase data on your disks if used incorrectly. Make sure you select the correct disk before proceeding. Top of Form
Solution 3: Remove Write Protection from Hard Drive via Windows Registry Editor
Before making any changes to the Registry Editor, it is important to back up your important files and data. Any changes made to the registry can potentially harm your system if done incorrectly.
Here are the steps to remove write protection from a hard drive using the Registry Editor:
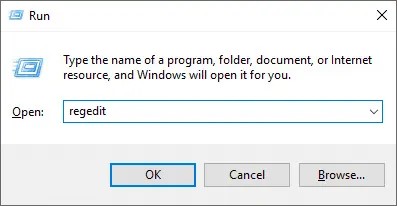
Step 1: Press the Windows key + R on your keyboard to open the Run dialog box.
Step 2: Type “regedit” and press Enter to open the Registry Editor.
Step 3: In the Registry Editor, navigate to the following key:
HKEY_LOCAL_MACHINE\SYSTEM\CurrentControlSet\Control\StorageDevicePolicies
Step 4: If you do not see the “StorageDevicePolicies” key, right-click on the “Control” key, select “New,” and then “Key.” Name the new key “StorageDevicePolicies.”
Step 5: Right-click on the “StorageDevicePolicies” key and select “New” and then “DWORD (32-bit) Value.”
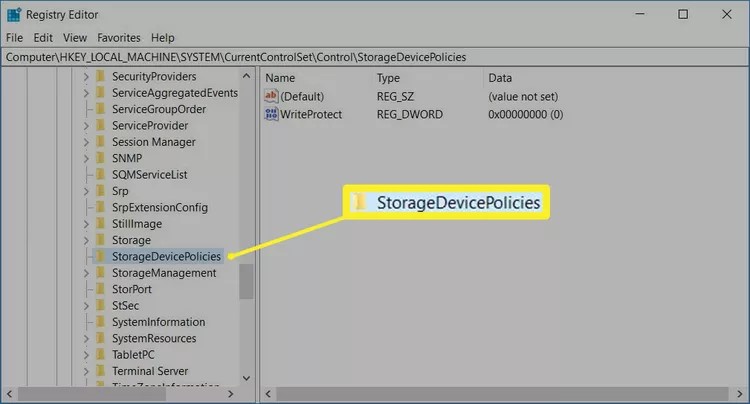
Step 6: Name the new value “WriteProtect” and set its value to 0.
Step 7: Close the Registry Editor and restart your computer.
After restarting your computer, the write protection on your hard drive should be removed. If you still encounter write protection issues, try another solution to fix the “the disk is write protected windows 10” error.
Conclusion
Although the write protection on hard drives protects your disk from unauthorized access or modification sometimes this feature becomes a nightmare for the users. This is because it prevents you from accessing your external hard drive.
Thus, it’s really important to remove write protection from the hard drive to make it accessible again. In this blog, I have suggested you some of the most effective ways that will surely help you to disable the write protection feature from your hard drive.
Therefore, if your external hard drive is write-protected and you want to remove the write protection then you must try out the above-listed solutions.
Hope your problem will be solved soon.
0 Comments