

Creating an SPF record correctly is essential for authenticating outgoing email and protecting your domain from spoofing and unauthorized use. A properly configured SPF record identifies the mail servers and third-party services authorized to send emails on behalf of your domain, helping improve email deliverability and strengthen email security. In this guide, we’ll explain SPF record syntax, mechanisms, qualifiers, and modifiers, followed by step-by-step instructions for creating and publishing an SPF record. You’ll also find practical examples for Google Workspace, Microsoft 365, Mailchimp, and multiple senders, along with best practices for avoiding common SPF errors and validating your configuration.
What an SPF Record Is and Why It Matters for Email Authentication
The Sender Policy Framework (SPF) record is a fundamental email authentication technique designed to protect your domain from email spoofing and unauthorized mail server access. An SPF record is a specific type of DNS (Domain Name System) entry called an SPF TXT record, which explicitly states which mail servers are authorized to send emails on behalf of your domain. Understanding how to create an SPF record correctly helps ensure that recipient mail systems can verify incoming messages from your domain, thereby improving email deliverability and enhancing overall email security.
Without an effective SPF record, cybercriminals can exploit your domain by sending malicious emails or spam through an unauthorized mail server, damaging your sender reputation and exposing recipients to phishing attacks. By correctly implementing and publishing an SPF record, organizations strengthen their defense against email spoofing and boost email validation rates for outgoing messages.
SPF Record Syntax Explained: Version Tag, Mechanisms, Modifiers, and Qualifiers
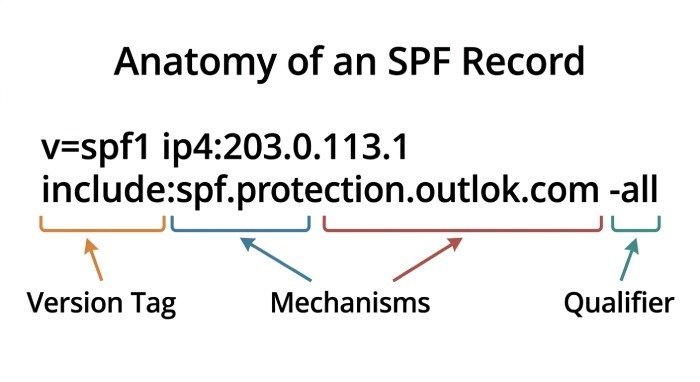
Understanding proper SPF syntax is crucial before you create an SPF record. The SPF specification outlines the structure of an SPF TXT record, which is composed of several parts:
Version Tag
Every SPF record begins with the mandatory SPF version tag:
v=spf1
This indicates that the record uses Sender Policy Framework version 1.
Mechanisms
Mechanisms define which IP addresses or hostnames are authorized mail servers for the domain. The core SPF mechanisms include:
- ip4: Specifies authorized IPv4 addresses (e.g., ip4:203.0.113.1)
- ip6: Specifies authorized IPv6 addresses
- mx: Authorizes servers listed in the domain’s MX records
- a: Authorizes hosts in the A (address) record(s) for your domain
- include: References another domain’s SPF policy, allowing the listed servers to send mail on your behalf (important for third-party mail server integration)
- all: Matches any sender; typically used at the end of the SPF record
Modifiers
Modifiers provide additional operational instructions and are normally not required for basic setups. Examples include:
- redirect=
- exp=
Qualifiers
Each mechanism can have a qualifier to control how it’s interpreted:
- + (pass): Explicitly allows mail (default; rarely needed)
- – (fail or hardfail): Mail from this server is not allowed (enforces a rejection)
- ~ (softfail): Mail from this server is likely not allowed but not definitively rejected
- ? (neutral): The server makes no assertion about mail from this source
Putting It All Together
A typical SPF TXT record might look like this:
v=spf1 ip4:203.0.113.1 include:spf.protection.outlook.com -all
This syntax authorizes a specific IPv4 address and Microsoft 365’s mail servers to send on behalf of the domain, and explicitly denies all others.
How to Create an SPF Record Step by Step for Your Domain
Creating and publishing an SPF record involves several careful steps to ensure correct email authentication and protection from email spoofing.
1. Identify Authorized Mail Servers
Compile a complete list of all services and servers that send mail for your domain. This should include your main email platform (such as Google Workspace or Microsoft 365), your internal mail servers, and any third-party mail servers like Mailchimp or Mimecast.
2. Write Your SPF Syntax
Determine the appropriate SPF syntax using mechanisms such as ip4, ip6, mx, and especially the include tag for any third-party deliverability. Start your SPF TXT record with the version tag (v=spf1). Each authorized mail server or service must be represented.
Example syntax:
v=spf1 ip4:198.51.100.17 include:_spf.*google*.com include:servers.mcsv.net -all
3. Log In to Your DNS Manager
Access your DNS manager—this could be your domain host provider’s dashboard (like GoDaddy, Cloudflare, or Namecheap). Locate the DNS settings section for your domain.
4. Add the SPF TXT Record
- Type: TXT record
- Name/Host: Usually “@” for the root domain or the subdomain if needed
- TXT value: Your complete SPF record string
- TTL (Time To Live): Typical values range from 1 hour (3600 seconds) to 24 hours
5. Publish DNS Record
Submit the form to add a TXT record. This action will publish SPF record to your DNS zone file. It can take up to 48 hours for DNS propagation.
6. Validate SPF Record
After publishing, use an SPF checker or SPF Validator tool—like MXToolbox SuperTool, DMARC Analyzer, or Mimecast Delivery Center—to perform an SPF lookup and confirm that the record is present and correctly formed. These tools also help uncover issues like excessive nested lookups or invalid SPF tags.
7. Update SPF Record as Needed
Whenever you change mail providers or add/remove authorized mail servers, promptly update SPF record in your DNS manager and revalidate.
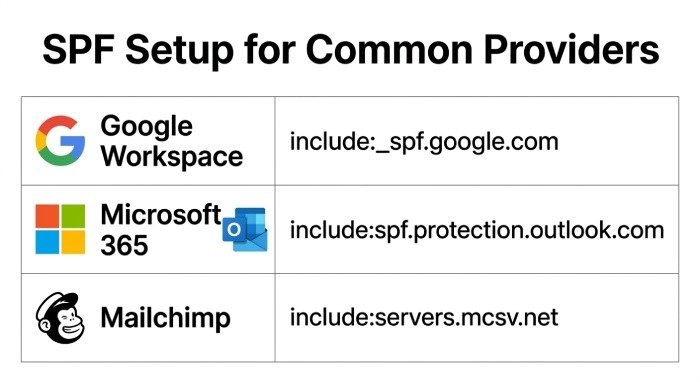
SPF Record Examples for Common Setups: Google Workspace, Microsoft 365, Mailchimp, and Multiple Senders
Google Workspace (Gmail)
If you use Google Workspace (formerly G Suite) for email, your SPF record should authorize Google’s outbound mail servers:
v=spf1 include:_spf.*google*.com ~all
- The include:_spf.*google*.com authorizes Google servers.
- The ~all indicates softfail for any non-authorized sender.
Microsoft 365 (Office mail server/Outlook)
For Office 365 and Microsoft Exchange Online:
v=spf1 include:spf.protection.outlook.com -all
- The -all enforces a hardfail policy, rejecting email sent from an unauthorized mail server.
Mailchimp
Mailchimp (a popular third-party mail server for newsletters) requires adding their servers:
v=spf1 include:servers.mcsv.net ?all
- This allows Mailchimp to send for your domain. Combine this statement with your primary provider using multiple include tags if necessary.
Multiple Senders (Google Workspace + Mailchimp)
Combine multiple services by chaining include statements:
v=spf1 include:_spf.*google*.com include:servers.mcsv.net -all
Be cautious not to exceed the DNS lookup limit (no more than 10 nested lookups per SPF specification).
Best Practices, Common Mistakes, and How to Test Your SPF Record
Best Practices
Limit DNS Lookups and Record Length
- Nested Lookup Limit: The SPF specification specifies a maximum of 10 DNS lookups. Too many include: statements or overly complex records may cause SPF validation to fail.
- SPF Record Length: Most DNS providers limit the TXT value to 255 characters; longer SPF records often require chunking or simplification.
Use the Correct Qualifier on the “all” Tag
- Softfail (~all) offers flexibility during initial deployment—unauthorized mail servers still deliver, but with warning.
- Hardfail (-all) is strict and recommended once you are confident your SPF record is accurate for maximum email spoofing protection.
Keep Record Updated
- Review and update SPF record whenever you add or remove authorized mail servers, change email providers, or use a new third-party service.
Deploy With Other Email Authentication Methods
- Combine SPF with DKIM and DMARC for stronger email validation and holistic protection against malicious emails.
Common SPF Mistakes
- Syntax Errors: Typos, missing mechanisms, or improperly formatted IP addresses/IP ranges.
- Redundant/Incorrect MX and include tags: Ensure only valid, in-use mail sources are referenced.
- Forgetting to Save SPF Record: Always save SPF record changes in the DNS manager and confirm propagation.
- Nonexistent or Deprecated Mechanisms: Avoid using old/deprecated SPF tags. Always follow the latest SPF specification.
How to Test and Validate Your SPF Record
- Use SPF checker tools like MXToolbox, DMARC Analyzer, or Delivery Center to perform an SPF lookup and validate SPF alignment.
- Google provides the Workspace Admin Toolbox, and Microsoft offers diagnostics via their Office domain account panels.
- Check for unauthorized mail servers or syntax errors using SPF Record Generator and SuperTool.
- Monitor Email Health using diagnostic platforms that analyze headers and look for potential Blacklists issues caused by misconfigured SPF policy.
Testing and regularly validating your SPF record ensures that approved servers can deliver email on your behalf and helps protect domain reputation. For advanced scenarios—including API Reference automation or custom DNS monitoring—dedicated solutions and plugins are available to streamline ongoing SPF policy management.



0 Comments